DynamicFields: Difference between revisions
Jump to navigation
Jump to search
| (12 intermediate revisions by 2 users not shown) | |||
| Line 1: | Line 1: | ||
{{DISPLAYTITLE:Dynamic Fields}} | {{DISPLAYTITLE:Dynamic Fields}} | ||
__TOC__ | __TOC__ | ||
<div style="background:linear-gradient(135deg,rgba(8,22,44,0.24),rgba(4,12,26,0.14),rgba(2,6,14,0.06));border:2px solid rgba(100,180,255,0.45);border-left:5px solid #3a8fe0;border-radius:10px;padding:22px 28px 20px;margin:0 0 30px 0;position:relative;overflow:hidden;"> | |||
<div style="position:absolute;top:0;right:0;width:280px;height:100%;background:linear-gradient(270deg,rgba(60,140,255,0.09),transparent);pointer-events:none;"></div> | |||
<div style="position:absolute;bottom:-18px;right:28px;font-size:5em;opacity:0.05;pointer-events:none;line-height:1;">⚔</div> | |||
<div style="font-family:'Georgia',serif;font-size:1.48em;font-weight:bold;color:#6ab8ff;letter-spacing:0.07em;text-transform:uppercase;margin-bottom:10px;text-shadow:0 0 22px rgba(80,160,255,0.42);">⚔ Dynamic Fields</div> | |||
<div style="color:#90b8d8;font-size:0.96em;line-height:1.70;max-width:840px;">Maps where <strong style="color:#c0d8f0;">player activity itself creates the boss encounter.</strong> Every kill on the correct map contributes to a shared progress counter. When the threshold is reached, a powerful Dynamic Boss spawns — then the field resets and the cycle begins again. No spawn timer. No waiting. Only hunting.</div> | |||
</div> | |||
== Overview == | == Overview == | ||
<div style="display:grid;grid-template-columns:1fr 300px;gap:18px;margin:0 0 30px 0;align-items:start;"> | |||
<div> | |||
<div style="background:linear-gradient(135deg,rgba(10,22,40,0.92),rgba(5,12,24,0.98));border:2px solid rgba(100,180,255,0.30);border-left:5px solid #3a8fe0;border-radius:9px;padding:18px 22px;margin:0 0 16px 0;"> | |||
<div style="font-weight:bold;color:#7fc2ff;font-size:1.02em;letter-spacing:0.06em;text-transform:uppercase;margin-bottom:9px;">🌐 Server-Wide Shared Objective</div> | |||
<div style="color:#7898b8;font-size:0.91em;line-height:1.68;">Dynamic Fields are shared progression maps. Every player killing the required monster contributes to the <strong style="color:#b0d0f0;">same spawn counter</strong>. The boss spawns at a random location on the map — or near where the final monster was killed. After the boss is defeated, progress resets and hunting begins again.</div> | |||
</div> | |||
<div style="background:linear-gradient(90deg,rgba(0,200,160,0.08),rgba(0,200,160,0.03),transparent);border:1px solid rgba(0,200,160,0.20);border-radius:8px;padding:10px 16px;color:#40c8a0;font-size:0.87em;line-height:1.65;"> | |||
Some <strong style="color:#60d8b8;">[[Fever System|Fever Fields & Fever Dungeons]]</strong> also function as Dynamic Fields, adding random-option equipment drops and Rupes Nigra materials on top of the Dynamic Boss reward. | |||
</div> | |||
</div> | |||
<div style="background:linear-gradient(135deg,rgba(6,14,28,0.94),rgba(3,8,18,0.99));border:1px solid rgba(100,180,255,0.18);border-radius:9px;padding:18px 16px;position:relative;overflow:hidden;"> | |||
<div style="position:absolute;top:0;left:0;right:0;height:2px;background:linear-gradient(90deg,transparent,rgba(80,160,255,0.40),transparent);"></div> | |||
<div style="font-family:'Courier New',monospace;font-size:0.62em;letter-spacing:0.13em;text-transform:uppercase;color:#3a5878;margin-bottom:14px;">// Cycle — How it works</div> | |||
<div style="display:flex;flex-direction:column;gap:0;position:relative;"> | |||
<div style="position:absolute;left:17px;top:32px;bottom:32px;width:2px;background:linear-gradient(180deg,rgba(80,160,255,0.28),rgba(80,160,255,0.06));z-index:0;"></div> | |||
<div style=" | <div style="display:flex;align-items:flex-start;gap:12px;padding:0 0 14px 0;position:relative;z-index:1;"><div style="width:36px;height:36px;border-radius:50%;background:rgba(80,160,255,0.16);border:2px solid rgba(80,160,255,0.36);display:flex;align-items:center;justify-content:center;font-weight:bold;color:#70b8ff;font-size:0.80em;flex-shrink:0;">1</div><div style="padding-top:8px;"><div style="font-weight:bold;color:#90c8f0;font-size:0.86em;margin-bottom:2px;">Hunt Required Monsters</div><div style="color:#5070a0;font-size:0.78em;line-height:1.50;">Kill the listed monster on its correct map.</div></div></div> | ||
<div style="display:flex;align-items:flex-start;gap:12px;padding:0 0 14px 0;position:relative;z-index:1;"><div style="width:36px;height:36px;border-radius:50%;background:rgba(80,160,255,0.16);border:2px solid rgba(80,160,255,0.36);display:flex;align-items:center;justify-content:center;font-weight:bold;color:#70b8ff;font-size:0.80em;flex-shrink:0;">2</div><div style="padding-top:8px;"><div style="font-weight:bold;color:#90c8f0;font-size:0.86em;margin-bottom:2px;">Progress Increases</div><div style="color:#5070a0;font-size:0.78em;line-height:1.50;">Each valid kill adds to the shared counter.</div></div></div> | |||
<div style="display:flex;align-items:flex-start;gap:12px;padding:0 0 14px 0;position:relative;z-index:1;"><div style="width:36px;height:36px;border-radius:50%;background:rgba(240,160,40,0.18);border:2px solid rgba(240,160,40,0.38);display:flex;align-items:center;justify-content:center;font-weight:bold;color:#f0c050;font-size:0.80em;flex-shrink:0;">3</div><div style="padding-top:8px;"><div style="font-weight:bold;color:#f0d080;font-size:0.86em;margin-bottom:2px;">Boss Appears</div><div style="color:#5070a0;font-size:0.78em;line-height:1.50;">Threshold reached — boss spawns on the map.</div></div></div> | |||
<div style="display:flex;align-items:flex-start;gap:12px;padding:0 0 14px 0;position:relative;z-index:1;"><div style="width:36px;height:36px;border-radius:50%;background:rgba(220,60,60,0.16);border:2px solid rgba(220,60,60,0.36);display:flex;align-items:center;justify-content:center;font-weight:bold;color:#ff8888;font-size:0.80em;flex-shrink:0;">4</div><div style="padding-top:8px;"><div style="font-weight:bold;color:#ff9898;font-size:0.86em;margin-bottom:2px;">Boss Defeated</div><div style="color:#5070a0;font-size:0.78em;line-height:1.50;">Kill the boss before it despawns.</div></div></div> | |||
"> | |||
<div style="font-weight:bold;color:# | <div style="display:flex;align-items:flex-start;gap:12px;position:relative;z-index:1;"><div style="width:36px;height:36px;border-radius:50%;background:rgba(40,200,120,0.16);border:2px solid rgba(40,200,120,0.36);display:flex;align-items:center;justify-content:center;font-weight:bold;color:#60e898;font-size:0.80em;flex-shrink:0;">5</div><div style="padding-top:8px;"><div style="font-weight:bold;color:#80e8a8;font-size:0.86em;margin-bottom:2px;">Rewards + Reset</div><div style="color:#5070a0;font-size:0.78em;line-height:1.50;">Loot. Field resets. Cycle restarts.</div></div></div> | ||
<div style="color:# | </div> | ||
</div> | </div> | ||
</div> | </div> | ||
== Dynamic Field Rules == | == Dynamic Field Rules == | ||
<div style="display:grid;grid-template-columns:1fr 1fr;gap:10px;margin:0 0 30px 0;"> | |||
<div style="padding:10px 14px;border-radius:7px;background:rgba(8,14,28,0.86);border:1px solid rgba(80,140,220,0.18);font-size:0.88em;color:#7090b8;display:flex;align-items:flex-start;gap:10px;line-height:1.58;"><span style="color:#4a80d8;flex-shrink:0;margin-top:1px;">●</span><span>Only kills on the <strong style="color:#a0c0e0;">correct map</strong> count toward that field's progress.</span></div> | |||
<div style="padding:10px 14px;border-radius:7px;background:rgba(8,14,28,0.86);border:1px solid rgba(80,140,220,0.18);font-size:0.88em;color:#7090b8;display:flex;align-items:flex-start;gap:10px;line-height:1.58;"><span style="color:#4a80d8;flex-shrink:0;margin-top:1px;">●</span><span>Only the <strong style="color:#a0c0e0;">listed required monster</strong> contributes to that field's counter.</span></div> | |||
<div style="padding:10px 14px;border-radius:7px;background:rgba(8,14,28,0.86);border:1px solid rgba(80,140,220,0.18);font-size:0.88em;color:#7090b8;display:flex;align-items:flex-start;gap:10px;line-height:1.58;"><span style="color:#4a80d8;flex-shrink:0;margin-top:1px;">●</span><span>Progress is <strong style="color:#a0c0e0;">shared by all players</strong> on the server — everyone's kills count.</span></div> | |||
<div style="padding:10px 14px;border-radius:7px;background:rgba(8,14,28,0.86);border:1px solid rgba(80,140,220,0.18);font-size:0.88em;color:#7090b8;display:flex;align-items:flex-start;gap:10px;line-height:1.58;"><span style="color:#4a80d8;flex-shrink:0;margin-top:1px;">●</span><span>Bosses may spawn <strong style="color:#a0c0e0;">randomly</strong> or near the location of the final required kill.</span></div> | |||
<div style="padding:10px 14px;border-radius:7px;background:rgba(8,14,28,0.86);border:1px solid rgba(80,140,220,0.18);font-size:0.88em;color:#7090b8;display:flex;align-items:flex-start;gap:10px;line-height:1.58;"><span style="color:#4a80d8;flex-shrink:0;margin-top:1px;">●</span><span>Some bosses are part of a <strong style="color:#a0c0e0;">chain</strong> — defeating one unlocks progress toward the next.</span></div> | |||
<div style="padding:10px 14px;border-radius:7px;background:rgba(8,14,28,0.86);border:1px solid rgba(80,140,220,0.18);font-size:0.88em;color:#7090b8;display:flex;align-items:flex-start;gap:10px;line-height:1.58;"><span style="color:#4a80d8;flex-shrink:0;margin-top:1px;">●</span><span>Dynamic Field bosses may appear in the <strong style="color:#a0c0e0;">[[MVP Timer]]</strong> when tracked by the server.</span></div> | |||
<div style="padding:10px 14px;border-radius:7px;background:rgba(8,14,28,0.86);border:1px solid rgba(0,200,160,0.18);font-size:0.88em;color:#7090b8;display:flex;align-items:flex-start;gap:10px;line-height:1.58;"><span style="color:#40c0a0;flex-shrink:0;margin-top:1px;">●</span><span>Some Dynamic Fields are also part of the <strong style="color:#80d8b8;">[[Fever System]]</strong> — granting random-option equipment on top of boss drops.</span></div> | |||
<div style="padding:10px 14px;border-radius:7px;background:rgba(8,14,28,0.86);border:1px solid rgba(0,200,160,0.18);font-size:0.88em;color:#7090b8;display:flex;align-items:flex-start;gap:10px;line-height:1.58;"><span style="color:#40c0a0;flex-shrink:0;margin-top:1px;">●</span><span>After the boss is defeated, the field <strong style="color:#80d8b8;">resets to zero</strong>. All maps start a fresh cycle.</span></div> | |||
</div> | |||
== Classic Dynamic Fields == | == Classic Dynamic Fields == | ||
<div style="background:linear-gradient(90deg,rgba(80,160,255,0.09),rgba(80,160,255,0.03),transparent);border:1px solid rgba(80,160,255,0.20);border-radius:8px;padding:10px 16px;margin:0 0 18px 0;color:#5080c0;font-size:0.88em;line-height:1.65;">Lighter Dynamic Fields based on classic Ragnarok mini-boss chains. Low kill requirements and familiar monsters — good entry points for understanding the system.</div> | |||
<div style=" | <div style="background:linear-gradient(135deg,rgba(8,14,26,0.94),rgba(4,8,18,0.99));border:1px solid rgba(255,255,255,0.08);border-radius:9px;overflow:hidden;margin:0 0 30px 0;"> | ||
<div style="background:linear-gradient(90deg,rgba(80,160,255,0.16),rgba(80,160,255,0.04),transparent);padding:12px 18px 10px;border-bottom:1px solid rgba(255,255,255,0.07);font-weight:bold;color:#6ab8ff;letter-spacing:0.09em;text-transform:uppercase;font-size:0.83em;">Classic Dynamic Spawn Table</div> | |||
"> | |||
<div style="background:linear-gradient(90deg,rgba(80,160,255,0.16),rgba(80,160,255,0.04),transparent);padding:12px 18px;border-bottom:1px solid rgba(255,255,255,0.07);font-weight:bold;color:# | |||
{| style="width:100%;border-collapse:collapse;margin:0;" | {| style="width:100%;border-collapse:collapse;margin:0;" | ||
|- | |- | ||
! style="background:rgba(0,0,0,0. | ! style="background:rgba(0,0,0,0.38);color:#7090b0;padding:9px 14px;text-align:left;font-size:0.82em;letter-spacing:0.08em;border-bottom:1px solid rgba(255,255,255,0.07);width:175px;" | Map | ||
! style="background:rgba(0,0,0,0. | ! style="background:rgba(0,0,0,0.38);color:#7090b0;padding:9px 14px;text-align:left;font-size:0.82em;letter-spacing:0.08em;border-bottom:1px solid rgba(255,255,255,0.07);" | Required Monster | ||
! style="background:rgba(0,0,0,0. | ! style="background:rgba(0,0,0,0.38);color:#7090b0;padding:9px 14px;text-align:center;font-size:0.82em;letter-spacing:0.08em;border-bottom:1px solid rgba(255,255,255,0.07);width:90px;" | Kills | ||
! style="background:rgba(0,0,0,0. | ! style="background:rgba(0,0,0,0.38);color:#7090b0;padding:9px 14px;text-align:left;font-size:0.82em;letter-spacing:0.08em;border-bottom:1px solid rgba(255,255,255,0.07);" | Boss Spawn | ||
|- | |- | ||
| style="padding:11px | | style="padding:11px 14px;border-bottom:1px solid rgba(255,255,255,0.04);font-family:'Courier New',monospace;font-size:0.82em;color:#5080a8;" | prt_fild02 | ||
| style="padding:11px | | style="padding:11px 14px;border-bottom:1px solid rgba(255,255,255,0.04);" | {{Monster|id=1063|name=Lunatic}} | ||
| style="padding:11px | | style="padding:11px 14px;text-align:center;border-bottom:1px solid rgba(255,255,255,0.04);" | <span style="font-family:'Courier New',monospace;color:#6ab8ff;font-weight:bold;">300</span> | ||
| style="padding:11px | | style="padding:11px 14px;border-bottom:1px solid rgba(255,255,255,0.04);" | {{Monster|id=1093|name=Eclipse}} | ||
|- | |- | ||
| style="padding:11px | | style="padding:11px 14px;border-bottom:1px solid rgba(255,255,255,0.04);font-family:'Courier New',monospace;font-size:0.82em;color:#5080a8;" | prt_fild04 / prt_fild07 | ||
| style="padding:11px | | style="padding:11px 14px;border-bottom:1px solid rgba(255,255,255,0.04);" | {{Monster|id=1052|name=Rocker}} | ||
| style="padding:11px | | style="padding:11px 14px;text-align:center;border-bottom:1px solid rgba(255,255,255,0.04);" | <span style="font-family:'Courier New',monospace;color:#6ab8ff;font-weight:bold;">300</span> | ||
| style="padding:11px | | style="padding:11px 14px;border-bottom:1px solid rgba(255,255,255,0.04);" | {{Monster|id=1088|name=Vocal}} | ||
|- | |- | ||
| style="padding:11px | | style="padding:11px 14px;border-bottom:1px solid rgba(255,255,255,0.04);font-family:'Courier New',monospace;font-size:0.82em;color:#5080a8;" | gef_fild01 | ||
| style="padding:11px | | style="padding:11px 14px;border-bottom:1px solid rgba(255,255,255,0.04);" | {{Monster|id=1012|name=Roda Frog}} | ||
| style="padding:11px | | style="padding:11px 14px;text-align:center;border-bottom:1px solid rgba(255,255,255,0.04);" | <span style="font-family:'Courier New',monospace;color:#6ab8ff;font-weight:bold;">300</span> | ||
| style="padding:11px | | style="padding:11px 14px;border-bottom:1px solid rgba(255,255,255,0.04);" | {{Monster|id=1089|name=Toad}} | ||
|- | |- | ||
| style="padding:11px | | style="padding:11px 14px;border-bottom:1px solid rgba(255,255,255,0.04);font-family:'Courier New',monospace;font-size:0.82em;color:#5080a8;" | moc_fild03 | ||
| style="padding:11px | | style="padding:11px 14px;border-bottom:1px solid rgba(255,255,255,0.04);" | {{Monster|id=1013|name=Wolf}} | ||
| style="padding:11px | | style="padding:11px 14px;text-align:center;border-bottom:1px solid rgba(255,255,255,0.04);" | <span style="font-family:'Courier New',monospace;color:#6ab8ff;font-weight:bold;">300</span> | ||
| style="padding:11px | | style="padding:11px 14px;border-bottom:1px solid rgba(255,255,255,0.04);" | {{Monster|id=1092|name=Vagabond Wolf}} | ||
|- | |- | ||
| style="padding:11px | | style="padding:11px 14px;border-bottom:1px solid rgba(255,255,255,0.04);font-family:'Courier New',monospace;font-size:0.82em;color:#5080a8;" | pay_fild04 | ||
| style="padding:11px | | style="padding:11px 14px;border-bottom:1px solid rgba(255,255,255,0.04);" | {{Monster|id=1002|name=Poring}} | ||
| style="padding:11px | | style="padding:11px 14px;text-align:center;border-bottom:1px solid rgba(255,255,255,0.04);" | <span style="font-family:'Courier New',monospace;color:#90e890;font-weight:bold;">300</span> | ||
| style="padding:11px 14px;border-bottom:1px solid rgba(255,255,255,0.04);" | {{Monster|id=1090|name=Mastering}} | |||
| style="padding:11px | |||
| | |||
|} | |} | ||
</div> | </div> | ||
| Line 115: | Line 99: | ||
== TimeRO Dynamic Boss Fields == | == TimeRO Dynamic Boss Fields == | ||
TimeRO adds stronger Dynamic Boss Fields with higher kill | <div style="background:linear-gradient(135deg,rgba(36,18,6,0.94),rgba(18,8,2,0.99));border:2px solid rgba(240,150,60,0.32);border-left:5px solid #f09030;border-radius:9px;padding:16px 22px;margin:0 0 20px 0;position:relative;overflow:hidden;"> | ||
<div style="position:absolute;top:0;right:0;width:180px;height:100%;background:linear-gradient(270deg,rgba(240,150,60,0.07),transparent);pointer-events:none;"></div> | |||
<div style="font-weight:bold;color:#f0a050;font-size:1.00em;letter-spacing:0.06em;text-transform:uppercase;margin-bottom:8px;">🔥 High-Value Shared Map Bosses</div> | |||
<div style="color:#a07848;font-size:0.91em;line-height:1.68;">TimeRO adds stronger Dynamic Boss Fields with higher kill thresholds. These are designed as <strong style="color:#d09060;">shared map objectives</strong> for parties, farmers, and hunters seeking special rewards. Two kill tiers exist — <strong style="color:#f8d888;">1500 kills</strong> for full-zone bosses and <strong style="color:#90e8a0;">500 kills</strong> for dungeon-specific bosses. The boss spawn location is random within the map.</div> | |||
</div> | |||
<div style=" | <div style="background:linear-gradient(135deg,rgba(8,14,26,0.94),rgba(4,8,18,0.99));border:1px solid rgba(255,255,255,0.08);border-radius:9px;overflow:hidden;margin:0 0 30px 0;"> | ||
<div style="display:grid;grid-template-columns:1fr 1fr;gap:0;"> | |||
<div style="border-right:1px solid rgba(255,255,255,0.06);"> | |||
<div style="background:linear-gradient(90deg,rgba(240,180,40,0.14),transparent);padding:11px 16px 9px;border-bottom:1px solid rgba(255,255,255,0.07);font-weight:bold;color:#f0c040;font-size:0.82em;letter-spacing:0.09em;text-transform:uppercase;display:flex;align-items:center;gap:8px;"><span style="font-family:'Courier New',monospace;background:rgba(240,180,40,0.16);border:1px solid rgba(240,180,40,0.30);padding:2px 7px;border-radius:4px;font-size:0.90em;">1500 kills</span> Field Bosses</div> | |||
<div style="padding:0;"> | |||
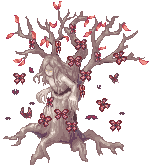
<div style="padding:12px 16px;border-bottom:1px solid rgba(255,255,255,0.04);"><div style="font-family:'Courier New',monospace;font-size:0.70em;color:#3a5878;margin-bottom:6px;">gon_dun01</div><div style="display:grid;grid-template-columns:1fr auto;align-items:center;gap:10px;"><div><div style="font-size:0.82em;color:#6080a0;margin-bottom:3px;">Hunt →</div>{{Monster|id=1410|name=Peachtree}}</div><div style="text-align:right;"><div style="font-size:0.78em;color:#6080a0;margin-bottom:3px;">Boss →</div>{{Monster|id=3106|name=Peachtree Matriarch}}</div></div><div style="margin-top:6px;font-size:0.77em;color:#3a5858;font-style:italic;">Nature-themed Dynamic Boss.</div></div> | |||
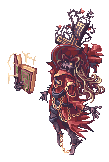
<div style="padding:12px 16px;border-bottom:1px solid rgba(255,255,255,0.04);"><div style="font-family:'Courier New',monospace;font-size:0.70em;color:#3a5878;margin-bottom:6px;">pay_dun03</div><div style="display:grid;grid-template-columns:1fr auto;align-items:center;gap:10px;"><div><div style="font-size:0.82em;color:#6080a0;margin-bottom:3px;">Hunt →</div>{{Monster|id=1170|name=Sohee}}</div><div style="text-align:right;"><div style="font-size:0.78em;color:#6080a0;margin-bottom:3px;">Boss →</div>{{Monster|id=3110|name=Lady Sohee}}</div></div><div style="margin-top:6px;font-size:0.77em;color:#3a5858;font-style:italic;">Spirit-themed Dynamic Boss.</div></div> | |||
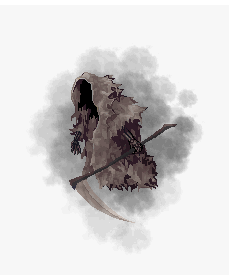
<div style="padding:12px 16px;border-bottom:1px solid rgba(255,255,255,0.04);"><div style="font-family:'Courier New',monospace;font-size:0.70em;color:#3a5878;margin-bottom:6px;">gl_church</div><div style="display:grid;grid-template-columns:1fr auto;align-items:center;gap:10px;"><div><div style="font-size:0.82em;color:#6080a0;margin-bottom:3px;">Hunt →</div>{{Monster|id=1117|name=Evil Druid}}</div><div style="text-align:right;"><div style="font-size:0.78em;color:#6080a0;margin-bottom:3px;">Boss →</div>{{Monster|id=3109|name=Grim Reaper}}</div></div><div style="margin-top:6px;font-size:0.77em;color:#3a5858;font-style:italic;">Undead holy-ground Dynamic Boss.</div></div> | |||
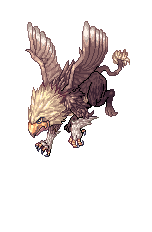
<div style="font-weight:bold;color:# | <div style="padding:12px 16px;"><div style="font-family:'Courier New',monospace;font-size:0.70em;color:#3a5878;margin-bottom:6px;">um_fild03</div><div style="display:grid;grid-template-columns:1fr auto;align-items:center;gap:10px;"><div><div style="font-size:0.82em;color:#6080a0;margin-bottom:3px;">Hunt →</div>{{Monster|id=1500|name=Parasite}}</div><div style="text-align:right;"><div style="font-size:0.78em;color:#6080a0;margin-bottom:3px;">Boss →</div>{{Monster|id=1259|name=Gryphon}}</div></div><div style="margin-top:6px;font-size:0.77em;color:#3a5858;font-style:italic;">Field-hunt Dynamic Boss.</div></div> | ||
<div style="color:# | </div> | ||
</div> | |||
<div> | |||
<div style="background:linear-gradient(90deg,rgba(80,200,100,0.12),transparent);padding:11px 16px 9px;border-bottom:1px solid rgba(255,255,255,0.07);font-weight:bold;color:#60d880;font-size:0.82em;letter-spacing:0.09em;text-transform:uppercase;display:flex;align-items:center;gap:8px;"><span style="font-family:'Courier New',monospace;background:rgba(80,200,100,0.14);border:1px solid rgba(80,200,100,0.28);padding:2px 7px;border-radius:4px;font-size:0.90em;">500 kills</span> Dungeon Bosses</div> | |||
<div style="padding:0;"> | |||
<div style="padding:12px 16px;border-bottom:1px solid rgba(255,255,255,0.04);"><div style="font-family:'Courier New',monospace;font-size:0.70em;color:#3a5878;margin-bottom:6px;">gl_sew03</div><div style="display:grid;grid-template-columns:1fr auto;align-items:center;gap:10px;"><div><div style="font-size:0.82em;color:#6080a0;margin-bottom:3px;">Hunt →</div>{{Monster|id=1207|name=Sting}}</div><div style="text-align:right;"><div style="font-size:0.78em;color:#6080a0;margin-bottom:3px;">Boss →</div>{{Monster|id=3108|name=Cling}}</div></div><div style="margin-top:6px;font-size:0.77em;color:#3a5858;font-style:italic;">Sewer-themed Dynamic Boss.</div></div> | |||
<div style="padding:12px 16px;border-bottom:1px solid rgba(255,255,255,0.04);"><div style="font-family:'Courier New',monospace;font-size:0.70em;color:#3a5878;margin-bottom:6px;">alde_dun03</div><div style="display:grid;grid-template-columns:1fr auto;align-items:center;gap:10px;"><div><div style="font-size:0.82em;color:#6080a0;margin-bottom:3px;">Hunt →</div>{{Monster|id=1216|name=Penomena}}</div><div style="text-align:right;"><div style="font-size:0.78em;color:#6080a0;margin-bottom:3px;">Boss →</div>{{Monster|id=3107|name=Jennifer}}</div></div><div style="margin-top:6px;font-size:0.77em;color:#3a5858;font-style:italic;">Clock Tower dungeon Dynamic Boss.</div></div> | |||
<div style="padding:12px 16px;border-bottom:1px solid rgba(255,255,255,0.04);"><div style="font-family:'Courier New',monospace;font-size:0.70em;color:#3a5878;margin-bottom:6px;">gef_fild14</div><div style="display:grid;grid-template-columns:1fr auto;align-items:center;gap:10px;"><div><div style="font-size:0.82em;color:#6080a0;margin-bottom:3px;">Hunt →</div>{{Monster|id=1213|name=High Orc}}</div><div style="text-align:right;"><div style="font-size:0.78em;color:#6080a0;margin-bottom:3px;">Boss →</div><span style="color:#c0d8e8;font-weight:bold;font-size:0.88em;">General Orc</span></div></div><div style="margin-top:6px;font-size:0.77em;color:#3a5858;font-style:italic;">Orc-themed Dynamic Boss.</div></div> | |||
<div style="padding:12px 16px;"><div style="font-family:'Courier New',monospace;font-size:0.70em;color:#3a5878;margin-bottom:6px;">gl_sew04</div><div style="display:grid;grid-template-columns:1fr auto;align-items:center;gap:10px;"><div><div style="font-size:0.82em;color:#6080a0;margin-bottom:3px;">Hunt →</div>{{Monster|id=1194|name=Arclouze}}</div><div style="text-align:right;"><div style="font-size:0.78em;color:#6080a0;margin-bottom:3px;">Boss →</div><span style="color:#c0d8e8;font-weight:bold;font-size:0.88em;">Sieglouse</span></div></div><div style="margin-top:6px;font-size:0.77em;color:#3a5858;font-style:italic;">Insect-themed Dynamic Boss.</div></div> | |||
</div> | </div> | ||
</div> | |||
</div> | |||
</div> | |||
== Poring Chain Fields == | |||
<div style="background:linear-gradient(135deg,rgba(22,12,40,0.92),rgba(10,6,22,0.98));border:2px solid rgba(200,100,255,0.30);border-left:5px solid #c060f0;border-radius:9px;padding:16px 22px;margin:0 0 18px 0;position:relative;overflow:hidden;"> | |||
<div style="position:absolute;top:0;right:0;width:180px;height:100%;background:linear-gradient(270deg,rgba(180,80,255,0.06),transparent);pointer-events:none;"></div> | |||
<div style="font-weight:bold;color:#d080ff;font-size:0.98em;letter-spacing:0.06em;text-transform:uppercase;margin-bottom:8px;">✨ Special Two-Stage Chain — pay_fild04</div> | |||
<div style="color:#906890;font-size:0.90em;line-height:1.68;max-width:700px;">The Poring Field contains the server's only two-stage <strong style="color:#c098e8;">escalating chain</strong> on the same map. Defeating the first boss enables the second stage. One map, two bosses, one after the other.</div> | |||
</div> | </div> | ||
<div style="background:linear-gradient(135deg,rgba(8,14,26,0.94),rgba(4,8,18,0.99));border:1px solid rgba(200,100,255,0.18);border-radius:9px;overflow:hidden;margin:0 0 30px 0;"> | |||
<div style="background:linear-gradient(90deg,rgba(180,80,255,0.14),transparent);padding:11px 18px 9px;border-bottom:1px solid rgba(255,255,255,0.07);font-weight:bold;color:#c080f8;font-size:0.82em;letter-spacing:0.09em;text-transform:uppercase;">pay_fild04 — Two-Stage Dynamic Chain</div> | |||
{| style="width:100%;border-collapse:collapse;margin:0;" | |||
|- | |- | ||
| | ! style="background:rgba(0,0,0,0.38);color:#7070a0;padding:9px 14px;text-align:center;font-size:0.82em;letter-spacing:0.08em;border-bottom:1px solid rgba(255,255,255,0.07);width:70px;" | Stage | ||
| | ! style="background:rgba(0,0,0,0.38);color:#7070a0;padding:9px 14px;text-align:left;font-size:0.82em;letter-spacing:0.08em;border-bottom:1px solid rgba(255,255,255,0.07);" | Hunt | ||
| | ! style="background:rgba(0,0,0,0.38);color:#7070a0;padding:9px 14px;text-align:center;font-size:0.82em;letter-spacing:0.08em;border-bottom:1px solid rgba(255,255,255,0.07);width:90px;" | Kills | ||
! style="background:rgba(0,0,0,0.38);color:#7070a0;padding:9px 14px;text-align:left;font-size:0.82em;letter-spacing:0.08em;border-bottom:1px solid rgba(255,255,255,0.07);" | Boss Spawn | |||
| | |||
|- | |- | ||
| | | style="padding:13px 14px;border-bottom:1px solid rgba(255,255,255,0.05);text-align:center;" | <div style="width:34px;height:34px;border-radius:50%;background:rgba(80,200,100,0.16);border:2px solid rgba(80,200,100,0.34);display:flex;align-items:center;justify-content:center;font-weight:bold;color:#70d888;font-size:0.82em;margin:0 auto;">1</div> | ||
| {{Monster|id= | | style="padding:13px 14px;border-bottom:1px solid rgba(255,255,255,0.05);" | {{Monster|id=1002|name=Poring}} | ||
| | | style="padding:13px 14px;text-align:center;border-bottom:1px solid rgba(255,255,255,0.05);" | <span style="font-family:'Courier New',monospace;color:#90e890;font-weight:bold;">300</span> | ||
| {{Monster|id= | | style="padding:13px 14px;border-bottom:1px solid rgba(255,255,255,0.05);" | {{Monster|id=1090|name=Mastering}} | ||
|- | |- | ||
| | | style="padding:13px 14px;text-align:center;" | <div style="width:34px;height:34px;border-radius:50%;background:rgba(200,100,255,0.16);border:2px solid rgba(200,100,255,0.34);display:flex;align-items:center;justify-content:center;font-weight:bold;color:#d080ff;font-size:0.82em;margin:0 auto;">2</div> | ||
| style="padding:13px 14px;" | {{Monster|id=1090|name=Mastering}} <span style="color:#5050a0;font-size:0.80em;">(Stage 2 unlocked)</span> | |||
| style="padding:13px 14px;text-align:center;" | <span style="font-family:'Courier New',monospace;color:#d080ff;font-weight:bold;">3</span> | |||
| style="padding:13px 14px;" | {{Monster|id=1096|name=Angeling}} | |||
| | |||
| {{Monster|id= | |||
| | |||
|- | |||
| | |||
| | |||
| {{Monster|id= | |||
|} | |} | ||
</div> | |||
== Clock Tower Dynamic Chain == | == Clock Tower Dynamic Chain == | ||
Clock Tower | <div style="background:linear-gradient(135deg,rgba(14,22,40,0.92),rgba(6,10,22,0.98));border:2px solid rgba(80,160,240,0.30);border-left:5px solid #4a88d8;border-radius:9px;padding:14px 20px;margin:0 0 18px 0;"> | ||
<div style="font-weight:bold;color:#70a8f8;font-size:0.96em;letter-spacing:0.06em;text-transform:uppercase;margin-bottom:7px;">🕐 Chain Progression — alde_dun03</div> | |||
<div style="color:#5070a0;font-size:0.90em;line-height:1.65;">A <strong style="color:#90c0ff;">two-stage boss chain</strong> inside Clock Tower. Defeating the first boss unlocks the hunt for a second, rarer boss. Low kill counts but valuable outcomes.</div> | |||
</div> | |||
<div style="background:linear-gradient(135deg,rgba(8,14,26,0.94),rgba(4,8,18,0.99));border:1px solid rgba(80,160,240,0.18);border-radius:9px;overflow:hidden;margin:0 0 30px 0;"> | |||
<div style="background:linear-gradient(90deg,rgba(80,160,240,0.14),transparent);padding:11px 18px 9px;border-bottom:1px solid rgba(255,255,255,0.07);font-weight:bold;color:#70a8f8;font-size:0.82em;letter-spacing:0.09em;text-transform:uppercase;">alde_dun03 — Clock Tower Chain</div> | |||
{| style="width:100%;border-collapse:collapse;margin:0;" | |||
|- | |- | ||
| | ! style="background:rgba(0,0,0,0.38);color:#6070a0;padding:9px 14px;text-align:center;font-size:0.82em;letter-spacing:0.08em;border-bottom:1px solid rgba(255,255,255,0.07);width:70px;" | Stage | ||
| | ! style="background:rgba(0,0,0,0.38);color:#6070a0;padding:9px 14px;text-align:left;font-size:0.82em;letter-spacing:0.08em;border-bottom:1px solid rgba(255,255,255,0.07);" | Required Monster | ||
| | ! style="background:rgba(0,0,0,0.38);color:#6070a0;padding:9px 14px;text-align:center;font-size:0.82em;letter-spacing:0.08em;border-bottom:1px solid rgba(255,255,255,0.07);width:90px;" | Kills | ||
| | ! style="background:rgba(0,0,0,0.38);color:#6070a0;padding:9px 14px;text-align:left;font-size:0.82em;letter-spacing:0.08em;border-bottom:1px solid rgba(255,255,255,0.07);" | Boss Spawn | ||
|- | |- | ||
| | | style="padding:13px 14px;border-bottom:1px solid rgba(255,255,255,0.05);text-align:center;" | <div style="width:34px;height:34px;border-radius:50%;background:rgba(80,160,240,0.16);border:2px solid rgba(80,160,240,0.34);display:flex;align-items:center;justify-content:center;font-weight:bold;color:#70b8f8;font-size:0.82em;margin:0 auto;">1</div> | ||
| | | style="padding:13px 14px;border-bottom:1px solid rgba(255,255,255,0.05);" | {{Monster|id=1295|name=Owl Baron}} | ||
| | | style="padding:13px 14px;text-align:center;border-bottom:1px solid rgba(255,255,255,0.05);" | <span style="font-family:'Courier New',monospace;color:#70b8f8;font-weight:bold;">30</span> | ||
| | | style="padding:13px 14px;border-bottom:1px solid rgba(255,255,255,0.05);" | <span style="color:#c0d8e8;font-weight:bold;">Crow Duke</span> | ||
| | |||
== | |||
|- | |- | ||
| | | style="padding:13px 14px;text-align:center;" | <div style="width:34px;height:34px;border-radius:50%;background:rgba(200,80,80,0.16);border:2px solid rgba(200,80,80,0.34);display:flex;align-items:center;justify-content:center;font-weight:bold;color:#f08888;font-size:0.82em;margin:0 auto;">2</div> | ||
| | | style="padding:13px 14px;" | <span style="color:#c0d8e8;font-weight:bold;">Crow Duke</span> <span style="color:#5050a0;font-size:0.80em;">(Stage 2 unlocked)</span> | ||
| | | style="padding:13px 14px;text-align:center;" | <span style="font-family:'Courier New',monospace;color:#f08888;font-weight:bold;">10</span> | ||
| | | style="padding:13px 14px;" | <span style="color:#ffb0b0;font-weight:bold;">Crow Baron</span> | ||
|} | |} | ||
</div> | |||
== | == MVP Timer Integration == | ||
<div style="display:grid;grid-template-columns:1fr 1fr 1fr;gap:12px;margin:0 0 22px 0;"> | |||
<div style="background:linear-gradient(160deg,rgba(8,14,30,0.90),rgba(4,8,20,0.97));border:1px solid rgba(80,140,240,0.24);border-top:3px solid #4a88d8;border-radius:9px;padding:18px 16px;text-align:center;"><div style="font-size:1.5em;margin-bottom:8px;">📊</div><div style="font-weight:bold;color:#6aa8f8;font-size:0.88em;letter-spacing:0.06em;text-transform:uppercase;margin-bottom:8px;">Summon Progress</div><div style="color:#506080;font-size:0.84em;line-height:1.60;">The required monster is being hunted. The boss has not yet spawned. Progress counter is active.</div></div> | |||
<div style="background:linear-gradient(160deg,rgba(10,28,16,0.90),rgba(5,16,8,0.97));border:1px solid rgba(60,200,100,0.24);border-top:3px solid #38c060;border-radius:9px;padding:18px 16px;text-align:center;"><div style="font-size:1.5em;margin-bottom:8px;">🐉</div><div style="font-weight:bold;color:#60d880;font-size:0.88em;letter-spacing:0.06em;text-transform:uppercase;margin-bottom:8px;">Summoned MVP</div><div style="color:#406050;font-size:0.84em;line-height:1.60;">Kill threshold reached. The Dynamic Boss is currently alive on the map. Hunt it now.</div></div> | |||
<div style="background:linear-gradient(160deg,rgba(24,8,8,0.90),rgba(14,4,4,0.97));border:1px solid rgba(200,60,60,0.22);border-top:3px solid #c03838;border-radius:9px;padding:18px 16px;text-align:center;"><div style="font-size:1.5em;margin-bottom:8px;">💀</div><div style="font-weight:bold;color:#f07070;font-size:0.88em;letter-spacing:0.06em;text-transform:uppercase;margin-bottom:8px;">Defeated</div><div style="color:#604040;font-size:0.84em;line-height:1.60;">The boss was killed. The field has reset. Progress returns to zero and the hunt cycle restarts.</div></div> | |||
</div> | |||
<div style="background:rgba(6,10,18,0.96);border:1px solid rgba(80,160,255,0.18);border-radius:8px;padding:16px 20px;margin:0 0 30px 0;"> | |||
<div style="font-family:'Courier New',monospace;font-size:0.65em;letter-spacing:0.12em;text-transform:uppercase;color:#3a5870;margin-bottom:10px;">// Example — MVP Timer progress display</div> | |||
<div style=" | <div style="font-family:'Courier New',monospace;color:#6ab8ff;font-size:0.90em;line-height:1.80;">Progress to summon Lady Sohee: <span style="color:#f8d060;">750</span> / <span style="color:#90e890;">1500</span> kills<br>Progress to summon Bloody Knight: <span style="color:#f8d060;">387</span> / <span style="color:#f07070;">1000</span> kills<br>Progress to summon Peachtree Matriarch: <span style="color:#f8d060;">1500</span> / <span style="color:#90e890;">1500</span> kills <span style="color:#60d880;">← BOSS ALIVE</span></div> | ||
"> | |||
Progress to summon Lady Sohee: 750 / 1500 kills | |||
</div> | </div> | ||
== Rewards == | == Rewards == | ||
<div style="display:grid;grid-template-columns:1fr 1fr;gap:14px;margin:0 0 30px 0;"> | |||
<div style="background:linear-gradient(135deg,rgba(8,14,26,0.92),rgba(4,8,18,0.98));border:1px solid rgba(80,160,240,0.20);border-radius:9px;padding:16px 18px;"> | |||
<div style="font-weight:bold;color:#6aa8f8;font-size:0.88em;letter-spacing:0.07em;text-transform:uppercase;margin-bottom:12px;padding-bottom:8px;border-bottom:1px solid rgba(80,160,240,0.14);">📦 Standard Boss Drops</div> | |||
<ul style="margin:0;padding:0 0 0 16px;color:#607090;font-size:0.88em;line-height:1.80;"><li>Special boss drops (unique per field)</li><li>Rare equipment pieces</li><li>Quest progression materials</li><li>Server-exclusive item types</li><li>Access to stronger chain bosses</li></ul> | |||
</div> | |||
<div style="background:linear-gradient(135deg,rgba(8,22,16,0.92),rgba(4,14,8,0.98));border:1px solid rgba(60,200,120,0.20);border-radius:9px;padding:16px 18px;"> | |||
<div style="font-weight:bold;color:#60d888;font-size:0.88em;letter-spacing:0.07em;text-transform:uppercase;margin-bottom:12px;padding-bottom:8px;border-bottom:1px solid rgba(60,200,120,0.14);">🌡 Dynamic Fields (Extra)</div> | |||
<ul style="margin:0;padding:0 0 0 16px;color:#507060;font-size:0.88em;line-height:1.80;"><li>Rupes Nigra Fragment / Shard / Stone</li><li>Fever-tier materials for crafting</li><li>Event boxes and progression chests</li></ul> | |||
</div> | |||
</div> | |||
== Design Notes == | == Design Notes == | ||
Dynamic Fields | <div style="background:linear-gradient(135deg,rgba(10,16,30,0.92),rgba(5,9,18,0.98));border:1px solid rgba(255,255,255,0.07);border-radius:9px;padding:18px 22px;margin:0 0 30px 0;display:grid;grid-template-columns:auto 1fr;gap:18px;align-items:start;"> | ||
<div style="width:50px;height:50px;border-radius:14px;background:rgba(80,160,240,0.12);border:1px solid rgba(80,160,240,0.22);display:flex;align-items:center;justify-content:center;font-size:1.5em;flex-shrink:0;">🌍</div> | |||
Instead of | <div> | ||
<div style="font-weight:bold;color:#6aa8d8;font-size:0.94em;letter-spacing:0.05em;text-transform:uppercase;margin-bottom:10px;">Making Maps Feel Alive</div> | |||
<div style="color:#506080;font-size:0.90em;line-height:1.72;">Dynamic Fields remove passive waiting from MVP hunting. Instead of standing at a spawn point for a fixed timer, players <strong style="color:#90b8d8;">actively push the map toward a boss encounter</strong> through collective hunting.</div> | |||
<div style="display:grid;grid-template-columns:1fr 1fr;gap:8px;margin-top:12px;"> | |||
<div style="padding:7px 12px;border-radius:6px;background:rgba(80,160,240,0.06);border:1px solid rgba(80,160,240,0.14);font-size:0.84em;color:#5080a8;">⚡ Active map farming</div> | |||
<div style="padding:7px 12px;border-radius:6px;background:rgba(80,160,240,0.06);border:1px solid rgba(80,160,240,0.14);font-size:0.84em;color:#5080a8;">🤝 Party coordination</div> | |||
<div style="padding:7px 12px;border-radius:6px;background:rgba(80,160,240,0.06);border:1px solid rgba(80,160,240,0.14);font-size:0.84em;color:#5080a8;">🌐 Server-wide participation</div> | |||
<div style="padding:7px 12px;border-radius:6px;background:rgba(80,160,240,0.06);border:1px solid rgba(80,160,240,0.14);font-size:0.84em;color:#5080a8;">📈 Long-term progression</div> | |||
</div> | |||
</div> | |||
</div> | |||
== Quick Reference == | == Quick Reference == | ||
<div style="background:linear-gradient(135deg,rgba(6,10,20,0.96),rgba(3,5,12,0.99));border:1px solid rgba(255,255,255,0.07);border-radius:9px;overflow:hidden;margin:0 0 16px 0;"> | |||
<div style="background:linear-gradient(90deg,rgba(80,160,240,0.12),transparent);padding:12px 18px 10px;border-bottom:1px solid rgba(255,255,255,0.07);font-weight:bold;color:#5090c8;font-size:0.83em;letter-spacing:0.10em;text-transform:uppercase;">Content Type Reference</div> | |||
! Best For | {| style="width:100%;border-collapse:collapse;margin:0;" | ||
|- | |||
! style="background:rgba(0,0,0,0.38);color:#6070a0;padding:9px 16px;text-align:left;font-size:0.82em;letter-spacing:0.08em;border-bottom:1px solid rgba(255,255,255,0.07);width:200px;" | Type | |||
! style="background:rgba(0,0,0,0.38);color:#6070a0;padding:9px 16px;text-align:left;font-size:0.82em;letter-spacing:0.08em;border-bottom:1px solid rgba(255,255,255,0.07);" | Best For | |||
|- | |- | ||
| Classic Dynamic Fields | | style="padding:11px 16px;border-bottom:1px solid rgba(255,255,255,0.04);color:#7090c8;font-weight:bold;" | Classic Dynamic Fields | ||
| Early mini-boss hunting | | style="padding:11px 16px;border-bottom:1px solid rgba(255,255,255,0.04);color:#6070a0;font-size:0.90em;" | Early mini-boss hunting, casual progression, learning the system. | ||
|- | |- | ||
| TimeRO Dynamic Boss Fields | | style="padding:11px 16px;border-bottom:1px solid rgba(255,255,255,0.04);color:#f0a050;font-weight:bold;" | TimeRO Dynamic Boss Fields | ||
| Shared map objectives, | | style="padding:11px 16px;border-bottom:1px solid rgba(255,255,255,0.04);color:#6070a0;font-size:0.90em;" | Shared map objectives, coordinated party hunting, higher-value rewards. | ||
|- | |- | ||
| Fever Dynamic Fields | | style="padding:11px 16px;border-bottom:1px solid rgba(255,255,255,0.04);color:#60d880;font-weight:bold;" | Fever Dynamic Fields | ||
| Advanced farming, random | | style="padding:11px 16px;border-bottom:1px solid rgba(255,255,255,0.04);color:#6070a0;font-size:0.90em;" | Advanced farming, random-option equipment, Fever materials, and Rupes Nigra. | ||
|- | |- | ||
| MVP Timer Tracking | | style="padding:11px 16px;color:#c080f8;font-weight:bold;" | MVP Timer Tracking | ||
| Checking boss status, summon progress, and active boss windows. | | style="padding:11px 16px;color:#6070a0;font-size:0.90em;" | Checking boss status, summon progress counter, and active boss windows in real time. | ||
|} | |} | ||
</div> | |||
== See Also == | |||
* [[MVP Timer]] · [[Fever System]] · [[Random Options]] | |||
* [[Extraction Fields]] · [[Quests]] · [[Daily Quests]] | |||
[[Category:General Information]] | [[Category:General Information]] | ||
[[Category:Fields]] | [[Category:Fields]] | ||
[[Category:Dynamic Fields]] | [[Category:Dynamic Fields]] | ||
Latest revision as of 04:10, 6 June 2026
Overview
🌐 Server-Wide Shared Objective
Dynamic Fields are shared progression maps. Every player killing the required monster contributes to the same spawn counter. The boss spawns at a random location on the map — or near where the final monster was killed. After the boss is defeated, progress resets and hunting begins again.
Some Fever Fields & Fever Dungeons also function as Dynamic Fields, adding random-option equipment drops and Rupes Nigra materials on top of the Dynamic Boss reward.
Dynamic Field Rules
●Only kills on the correct map count toward that field's progress.
●Only the listed required monster contributes to that field's counter.
●Progress is shared by all players on the server — everyone's kills count.
●Bosses may spawn randomly or near the location of the final required kill.
●Some bosses are part of a chain — defeating one unlocks progress toward the next.
●Dynamic Field bosses may appear in the MVP Timer when tracked by the server.
●Some Dynamic Fields are also part of the Fever System — granting random-option equipment on top of boss drops.
●After the boss is defeated, the field resets to zero. All maps start a fresh cycle.
Classic Dynamic Fields
Lighter Dynamic Fields based on classic Ragnarok mini-boss chains. Low kill requirements and familiar monsters — good entry points for understanding the system.


TimeRO Dynamic Boss Fields


Poring Chain Fields

Clock Tower Dynamic Chain
🕐 Chain Progression — alde_dun03
A two-stage boss chain inside Clock Tower. Defeating the first boss unlocks the hunt for a second, rarer boss. Low kill counts but valuable outcomes.

MVP Timer Integration
📊
Summon Progress
The required monster is being hunted. The boss has not yet spawned. Progress counter is active.
🐉
Summoned MVP
Kill threshold reached. The Dynamic Boss is currently alive on the map. Hunt it now.
💀
Defeated
The boss was killed. The field has reset. Progress returns to zero and the hunt cycle restarts.
// Example — MVP Timer progress display
Progress to summon Lady Sohee: 750 / 1500 kills
Progress to summon Bloody Knight: 387 / 1000 kills
Progress to summon Peachtree Matriarch: 1500 / 1500 kills ← BOSS ALIVE
Progress to summon Bloody Knight: 387 / 1000 kills
Progress to summon Peachtree Matriarch: 1500 / 1500 kills ← BOSS ALIVE
Rewards
📦 Standard Boss Drops
- Special boss drops (unique per field)
- Rare equipment pieces
- Quest progression materials
- Server-exclusive item types
- Access to stronger chain bosses
🌡 Dynamic Fields (Extra)
- Rupes Nigra Fragment / Shard / Stone
- Fever-tier materials for crafting
- Event boxes and progression chests
Design Notes
🌍
Making Maps Feel Alive
Dynamic Fields remove passive waiting from MVP hunting. Instead of standing at a spawn point for a fixed timer, players actively push the map toward a boss encounter through collective hunting.
⚡ Active map farming
🤝 Party coordination
🌐 Server-wide participation
📈 Long-term progression